Sunday, January 25, 2015
Artistic Interlude Part 2
Work continues on dressing up the two forward frames (5 and 6). As mentioned previously, these frames have exposure in the berthing compartment at the front and therefore, I have decided to soften exposed edges and add some inlaid artwork to dress up some of the corner gussets. Other gussets will get a simple mahogany veneer.The purpose is to hide the plywood making up the gussets.
All of this will be added before encapsulating the frames in epoxy, so that process has been halted while I work on these two frames.
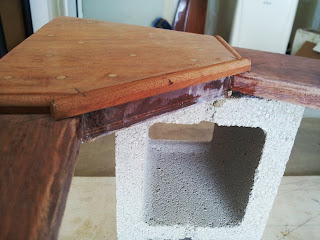
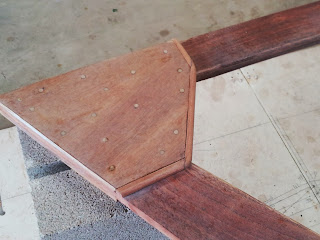
Here is an example of the gusset. You can see that its plywood edges are still sharp while the frames on both sides have been rounded over. The plywood has bronze nail heads showing and a different texture than the surrounding frames. The flat diagonal surface between the frames is also rather ugly and needs dressing as well.

The first step was to make rounded over pieces approximately 3/8 inch in height that will fit up against the edge of the plywood on the three inner edges. That required some fitting, filing, and sanding to get them to the correct shape. At this point they still overlap one another, but this will be cleaned up subsequently.
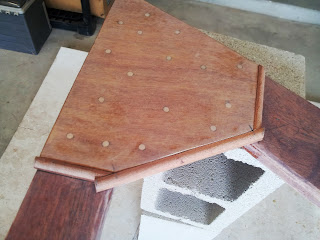
That still leaves the flat diagonal area between the frames to cover. You can see it below the pieces previously fashioned.
But first, the smaller pieces need to be glued together to fit around the gusset. I used the same epoxy I have been constructing the frames with, however, I added some wood dust to color it somewhat.
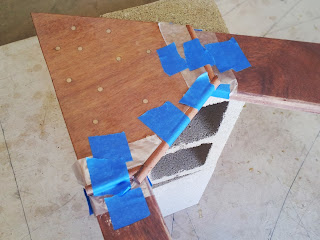
Once the epoxy has cured between the parts, the overlaps are blended in so that the part has a nice pleasing shape. Then another piece is fashioned to cover the flat diagonal area and epoxied to the previous pieces. This piece is also shaped to match the contour of the previous pieces as well as matching up to the frame members on each side.
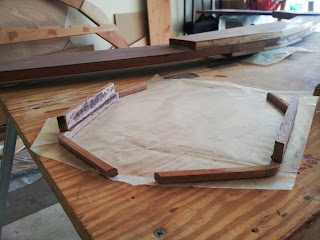
The end result after cleaning up is a nice end cap that blends the sharp plywood edges into the frames. This end cap will be glued in such a manner that it is slightly higher than the plywood gusset. This is because a veneer will be applied to that surface and I want the veneer to blend into the end caps as well. More on that in a moment. Here is the end cap, after sanding, but before it has been glued into position.
All of these photos were of frame 6. That frame is only getting the round over treatment on one side as the other side will eventually have a plywood panel attached to it. However, frame 5 is further aft and will need the round over treatment on both sides as well as an extra set of gussets.
So far, I have the two end caps for frame 6 completed and have started making the end caps for frame 5. The rest of my week has been devoted to house chores, but I did spend some time trying to cut out the artwork for frame 6.
If you recall, this was going to be a wood veneer with multiple colors inlaid into that veneer. The art work consisted of a sailing ship and a compass rose. I attempted to cut out the sailing ship using brand new x-acto blades. While I didnt have any trouble cutting along the lines of the small pieces, I did have trouble with the veneers disintegrating under the pressure of the knife. The smaller pieces were especially prone to this.
Ultimately, I had to abandon this approach as the parts were damaged too much to be used. So I decided to do some research on getting the parts laser cut. I have a few possibilities that I will be exploring more this weekend and next week. In the meantime, I will continue with the remaining end caps.
Frame 5s gussets wont be getting any artwork, but just a simple wood veneer. So once the endcaps are finished for that frame I will move on to adding the veneer. Frames 6s veneer and artwork will take a little while longer so I can solve the problem of cutting out the art.
The only other progress was the completion of encapsulation for frame 4, which gives me four frames completed with that process. Only frames 5, 6 and 0 (the transom) remain. As I mentioned, frames 5 and 6 will get encapsulation after the dressing up. The transom frame, can only be partially encapsulated because one side will eventually be attached to plywood, which I currently dont have.
So depending upon what I find with my research into laser cutting, I am hoping to have some inlaid artwork to share in the next post. Well see.
All of this will be added before encapsulating the frames in epoxy, so that process has been halted while I work on these two frames.
Here is an example of the gusset. You can see that its plywood edges are still sharp while the frames on both sides have been rounded over. The plywood has bronze nail heads showing and a different texture than the surrounding frames. The flat diagonal surface between the frames is also rather ugly and needs dressing as well.

The first step was to make rounded over pieces approximately 3/8 inch in height that will fit up against the edge of the plywood on the three inner edges. That required some fitting, filing, and sanding to get them to the correct shape. At this point they still overlap one another, but this will be cleaned up subsequently.

That still leaves the flat diagonal area between the frames to cover. You can see it below the pieces previously fashioned.

But first, the smaller pieces need to be glued together to fit around the gusset. I used the same epoxy I have been constructing the frames with, however, I added some wood dust to color it somewhat.

Once the epoxy has cured between the parts, the overlaps are blended in so that the part has a nice pleasing shape. Then another piece is fashioned to cover the flat diagonal area and epoxied to the previous pieces. This piece is also shaped to match the contour of the previous pieces as well as matching up to the frame members on each side.

The end result after cleaning up is a nice end cap that blends the sharp plywood edges into the frames. This end cap will be glued in such a manner that it is slightly higher than the plywood gusset. This is because a veneer will be applied to that surface and I want the veneer to blend into the end caps as well. More on that in a moment. Here is the end cap, after sanding, but before it has been glued into position.

All of these photos were of frame 6. That frame is only getting the round over treatment on one side as the other side will eventually have a plywood panel attached to it. However, frame 5 is further aft and will need the round over treatment on both sides as well as an extra set of gussets.

So far, I have the two end caps for frame 6 completed and have started making the end caps for frame 5. The rest of my week has been devoted to house chores, but I did spend some time trying to cut out the artwork for frame 6.
If you recall, this was going to be a wood veneer with multiple colors inlaid into that veneer. The art work consisted of a sailing ship and a compass rose. I attempted to cut out the sailing ship using brand new x-acto blades. While I didnt have any trouble cutting along the lines of the small pieces, I did have trouble with the veneers disintegrating under the pressure of the knife. The smaller pieces were especially prone to this.
Ultimately, I had to abandon this approach as the parts were damaged too much to be used. So I decided to do some research on getting the parts laser cut. I have a few possibilities that I will be exploring more this weekend and next week. In the meantime, I will continue with the remaining end caps.
Frame 5s gussets wont be getting any artwork, but just a simple wood veneer. So once the endcaps are finished for that frame I will move on to adding the veneer. Frames 6s veneer and artwork will take a little while longer so I can solve the problem of cutting out the art.
The only other progress was the completion of encapsulation for frame 4, which gives me four frames completed with that process. Only frames 5, 6 and 0 (the transom) remain. As I mentioned, frames 5 and 6 will get encapsulation after the dressing up. The transom frame, can only be partially encapsulated because one side will eventually be attached to plywood, which I currently dont have.
So depending upon what I find with my research into laser cutting, I am hoping to have some inlaid artwork to share in the next post. Well see.
Subscribe to:
Post Comments (Atom)
0 comments:
Post a Comment